Case Study: How to Make Your Matchmaking Website Load in 1 Second
 Blog")
 By Ricardo – Updated on July 31, 2022
Hello everyone,
In today’s post, I will be talking about how to make your Matchmaking Website load in 1 second in less than 2 hours.
There are a couple of reasons why your site must load faster:
And how can we load our websites faster? Using the “Faster Is Better Formula”.
In this case study, I’m going to show you step by step, in detail, how I did it so you can do it on your site, too, whether you do it by yourself or you send this information to your Designer or Developer to help you with this.
To make it easy to understand, here it’s a table of content to navigate through the content without any problem.


How I Used the “Faster Is Better Formula”.
I have to be honest. I didn’t pay too much attention to my website speed. I was busy attending to clients, doing this, and that.
Until one day, I wanted to start sharing content on my site.
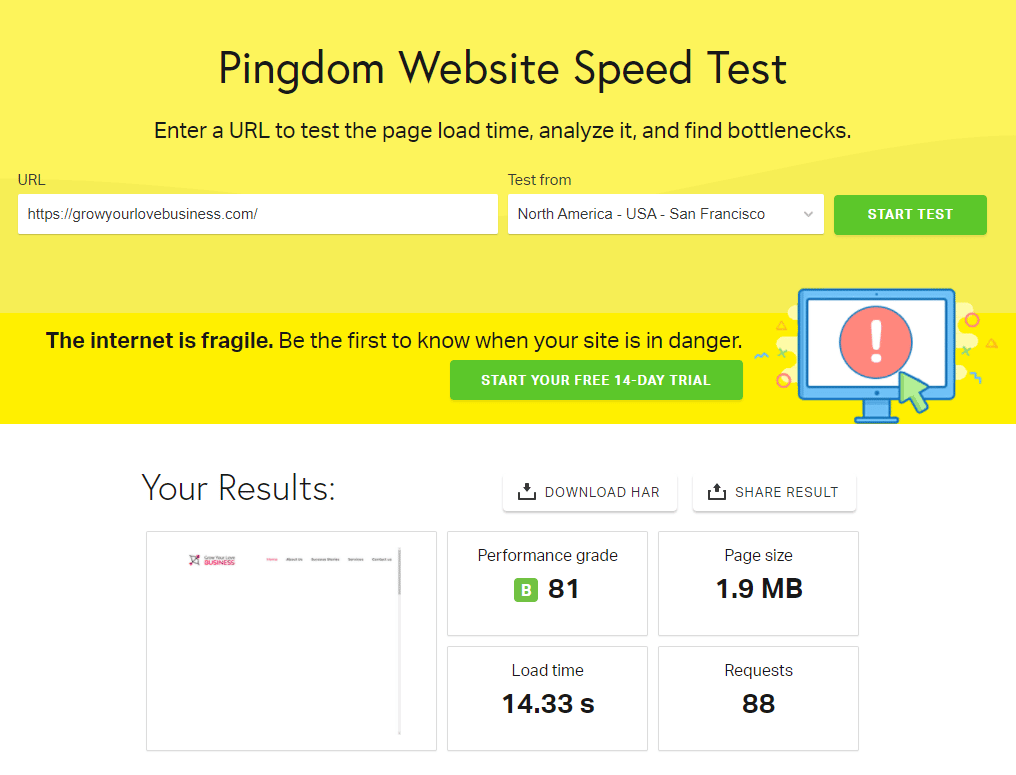
So, my website must load faster. And the first thing I did was make a test using a tool called Pingdom Website Speed Test, which I recommend to check your website speed first and know if you need to apply this formula on your website.
It was loading at 14.33 seconds. As you can see, my website needed to load faster. It took more than 10 seconds to load, which is a lot of time and hurts the user experience tremendously.
And it’s embarrassing!
I needed it to fix this right away. I feel it’s too much time to load the website.
But! Nothing to worry. This case study has a happy ending after executing the “Faster Is Better Formula” ?
I don’t want to spoil the result. All I’m going to say is: it loads much better.
And thanks to this, you can browse this content in no time. Otherwise, you’ll still be waiting to read this case study.
The million-dollar question, how do I dare say that if you follow this case study, your Matchmaking Website will be loaded in 1 second?
There are different ways to make this happen. I’ll mention three of them:
- Login to your WordPress website, make some adjustments to your site, install some free plugins, adjust the entire website, and you may be there days fixing many details that you’ll find on your website.
- Another way is hiring a freelancer that you already know or not and waiting for the best.
- The last option is the one I have here today: install a plugin, do a couple of clicks following step-by-step how to do it. And you’ll see an enormous difference in less than 2 hours the next time you refresh your browser.
Hard to believe?
No worries! Let’s go to the explanation, but before we proceed, you need to know two requirements that are needed:
- Your Matchmaking Website must be WordPress.
- An annual investment of $49 to get a license for the plugin.
That’s the only downside. But, if you have both, let’s begin.
The 4-Steps to Apply the Formula.
This formula is made of just four steps which are.
- Get your license.
- Download and install it on your website.
- Doing the basic configuration.
- Refresh your website and make a new Speed test.
And I go over it all in detail next:
Step #1 – Get your license.
All the magic is thanks to a WordPress plugin: WP Rocket, which you can purchase here.
Once on the website, click “Buy WP Rocket” at the top right.

We need to choose the type of license for our website. I’ll choose “Single” for this case study. To proceed, I’ll click on “Buy WP Rocket”.

Next, let’s fill out the form with our personal information, choose a payment method, and click on the “Place order” button.

Step #2 – Download and install it on your website.
After the purchase is processed, we’ll be redirected to a confirmation page, and from here, we can download it. Let’s click on “Download WP Rocket”.

Either way, we’ll receive an e-mail from WP-Rocket with the login credentials to access your account and the instructions to get started.
And if we access our account, we’ll be able to download the plugin anytime.
Once we have the plugin downloaded, the next thing we need is to login into the WordPress platform.

Hover your mouse over “Plugins” and click on “Add New”.

We’re going to upload the WP Rocket plugin. To do that, click on “Upload Plugin”, choose the ZIP File you downloaded and click on the “Install Now” button.

Once it’s installed, let’s activate it, click on “Activate Plugin”.

Congrats! We’re almost there.
Now you have the plugin installed and activated.
Step #3 – Doing the basic configuration.
Excellent!
After the installation, we have the first recommendation from WP Rocket:

I have installed two plugins incompatible with WP Rocket, I will deactivate them immediately. Just click on Deactivate.
Next, we’ll hover our mouse under “Settings”, and I’ll click on “WP Rocket”.

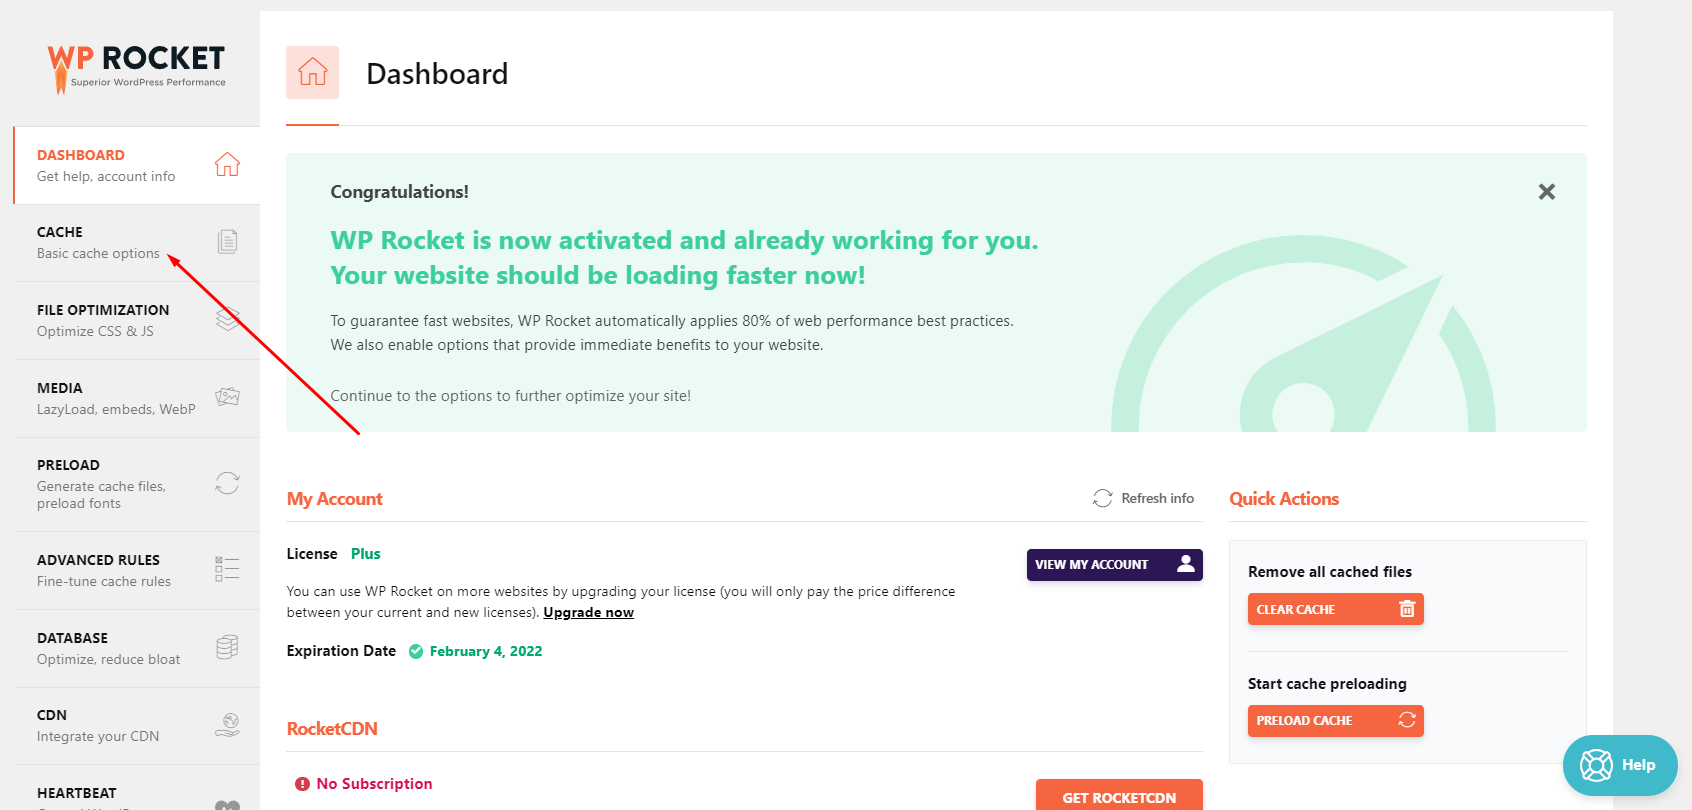
The first thing I see it’s the Dashboard. We can see more messages at the top. It recommends Clear cache, so that’s the first thing I’ll do.
And it asks me to collect non-sensitive data, and I’ll permit doing it.
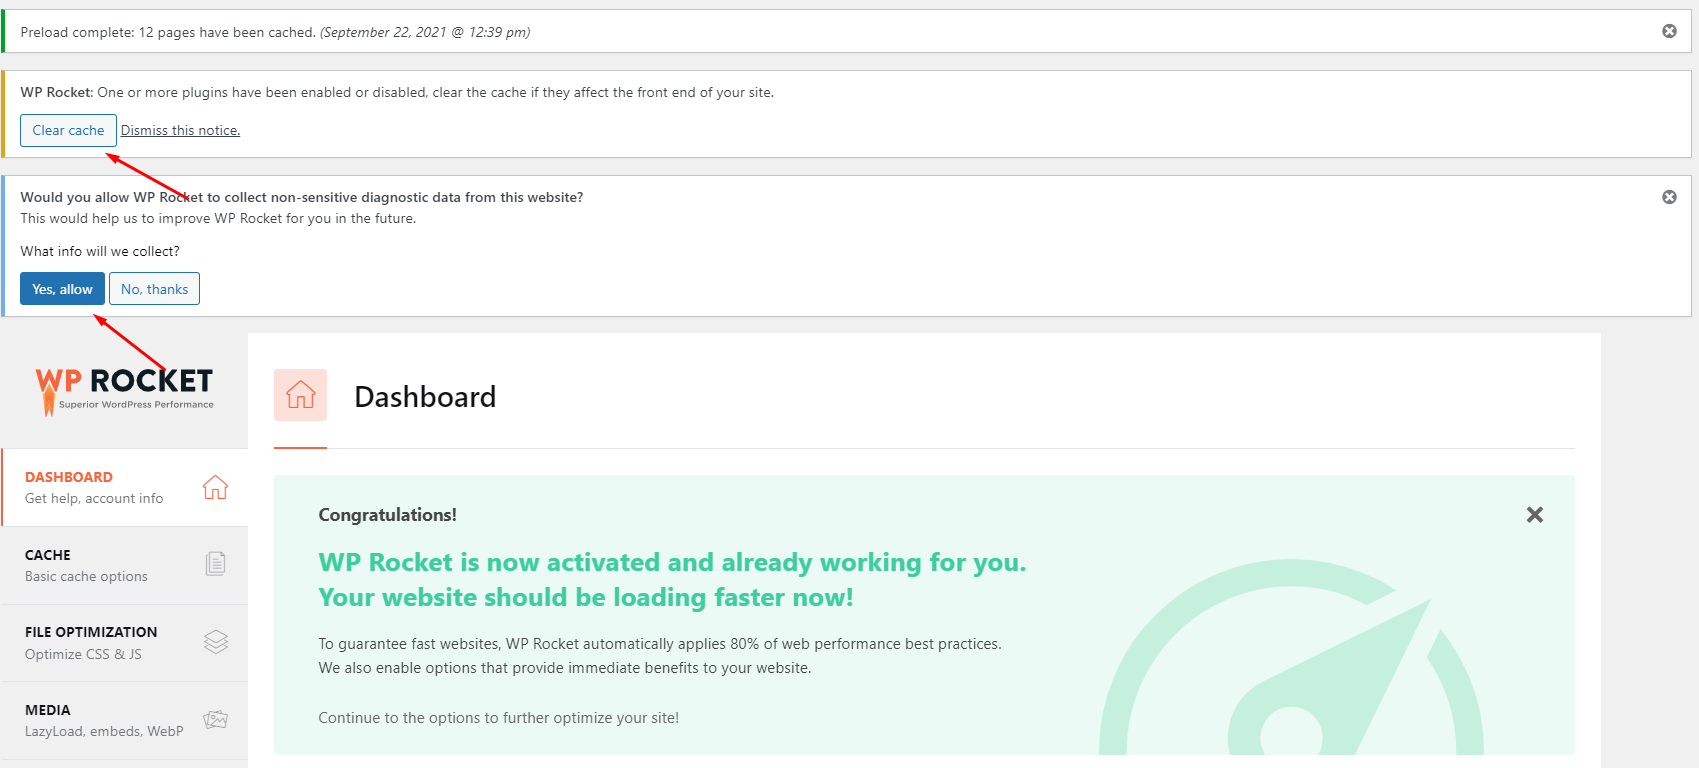
As it is, the plugin is activated and must be loading your website faster.
However, I recommend making the following five adjustments.
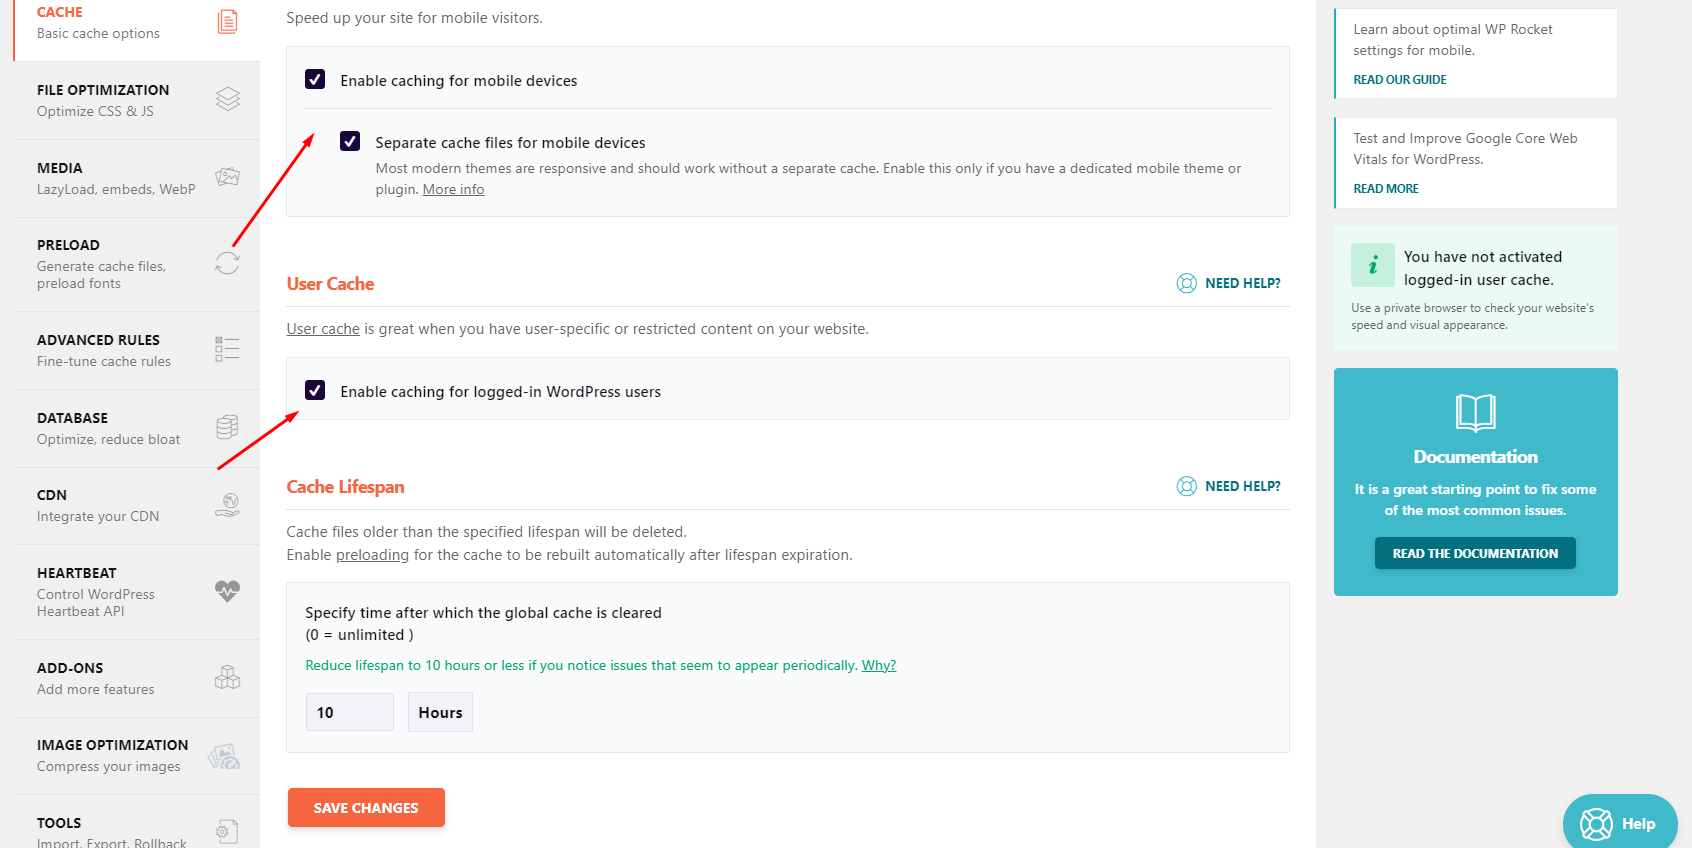
#1st Adjustment – Cache adjustment.
From the WP Rocket Dashboard, click on “Cache”.
Check the following options:
- Enable caching for mobile devices
- Separate cache files for mobile devices
- Enable caching for logged-in WordPress users
And click on “Save Changes”.
#2nd Adjustment – File Optimization adjustment.
It’s time to make File Optimization adjustments. Click on that on the left and choose the following options:
- Minify CSS files
- Combine CSS files (Enable Minify CSS files to select)
- Optimize CSS delivery
- Remove Unused CSS (Beta)
- Minify JavaScript files
- Combine JavaScript files (Enable Minify JavaScript files to select)
- Load JavaScript deferred
- Delay JavaScript execution
And click on “Save Changes”.
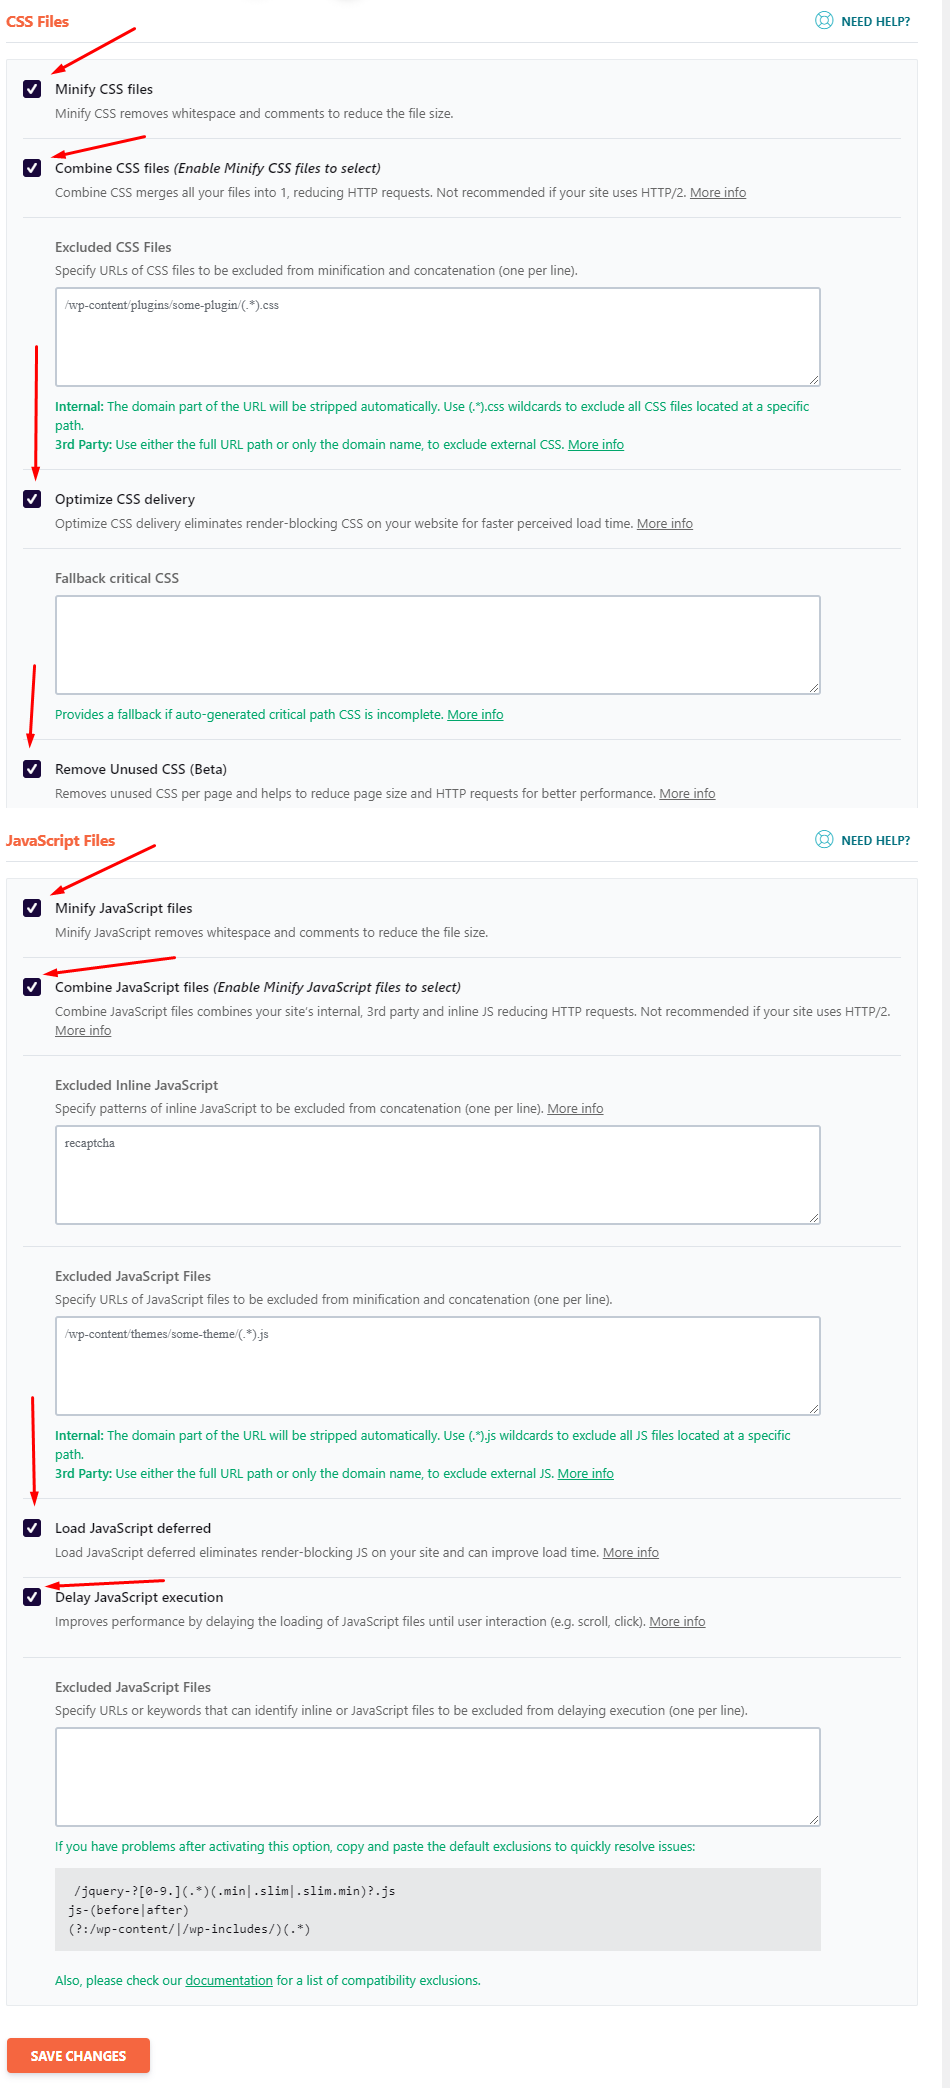
When activating some of the options, you’ll see a message that says, “This could break things!”, no worries, click on “Activate Minify CSS”.
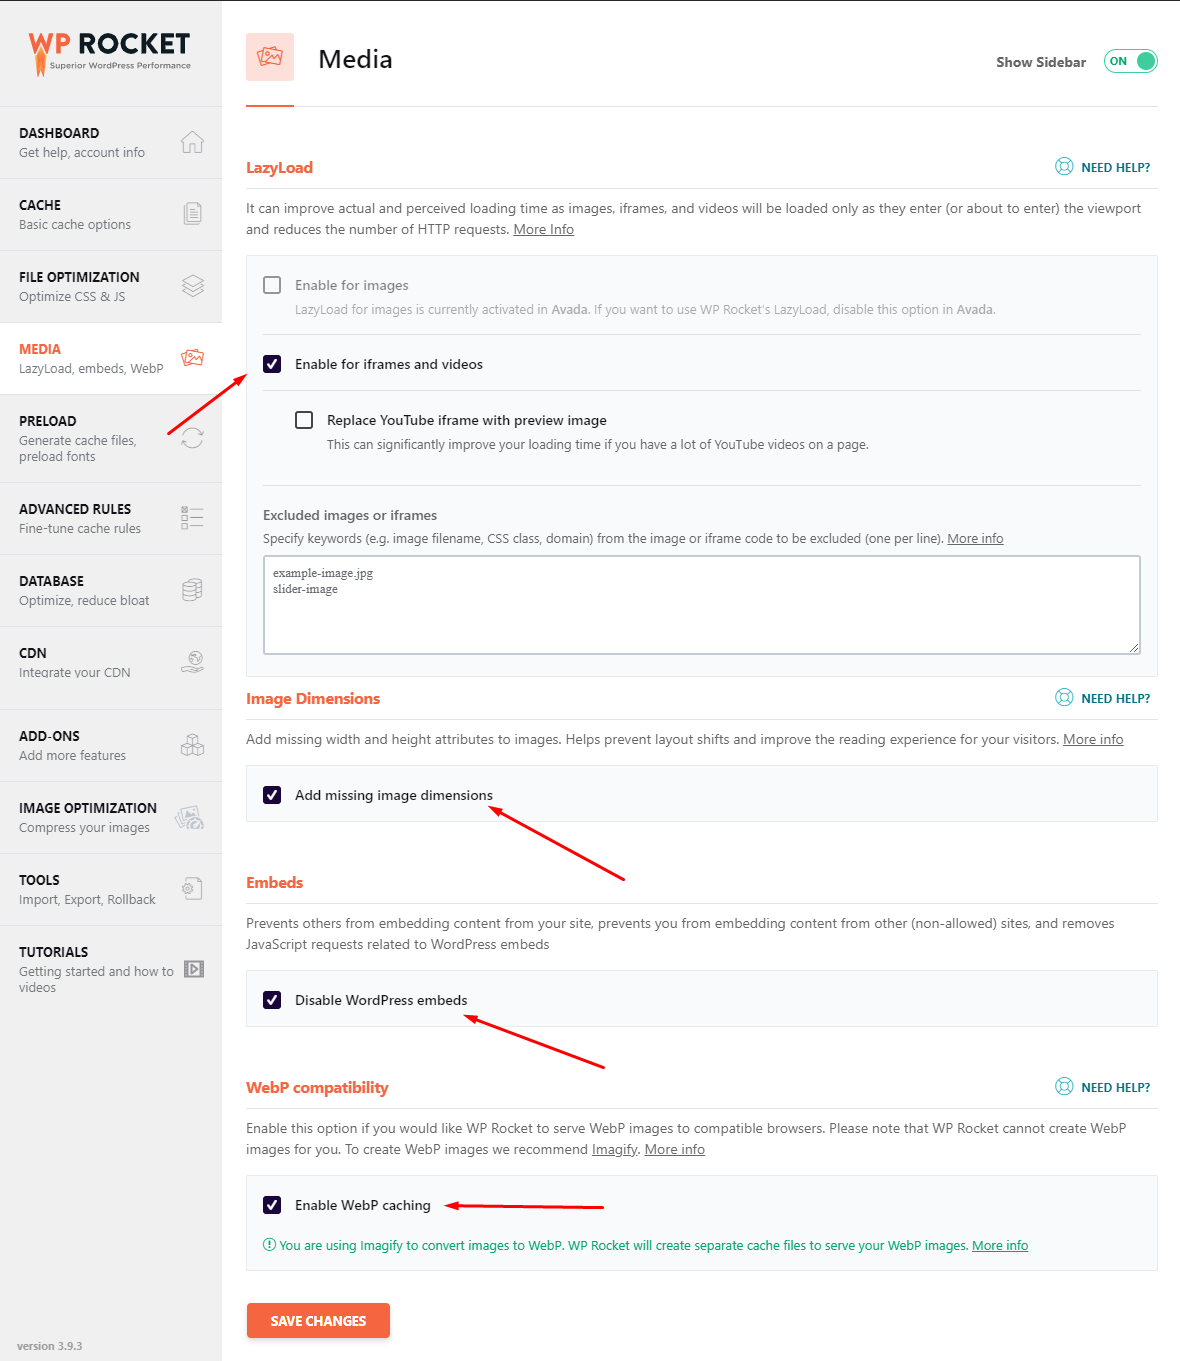
#3rd Adjustment – Media adjustment.
Let’s work on the Media adjustments. Click on it, and the options I recommend to activate are:
- Enable for iframes and videos
- Add missing image dimensions
- Disable WordPress embeds
- Enable WebP caching
Finally, click on “Save Changes”.
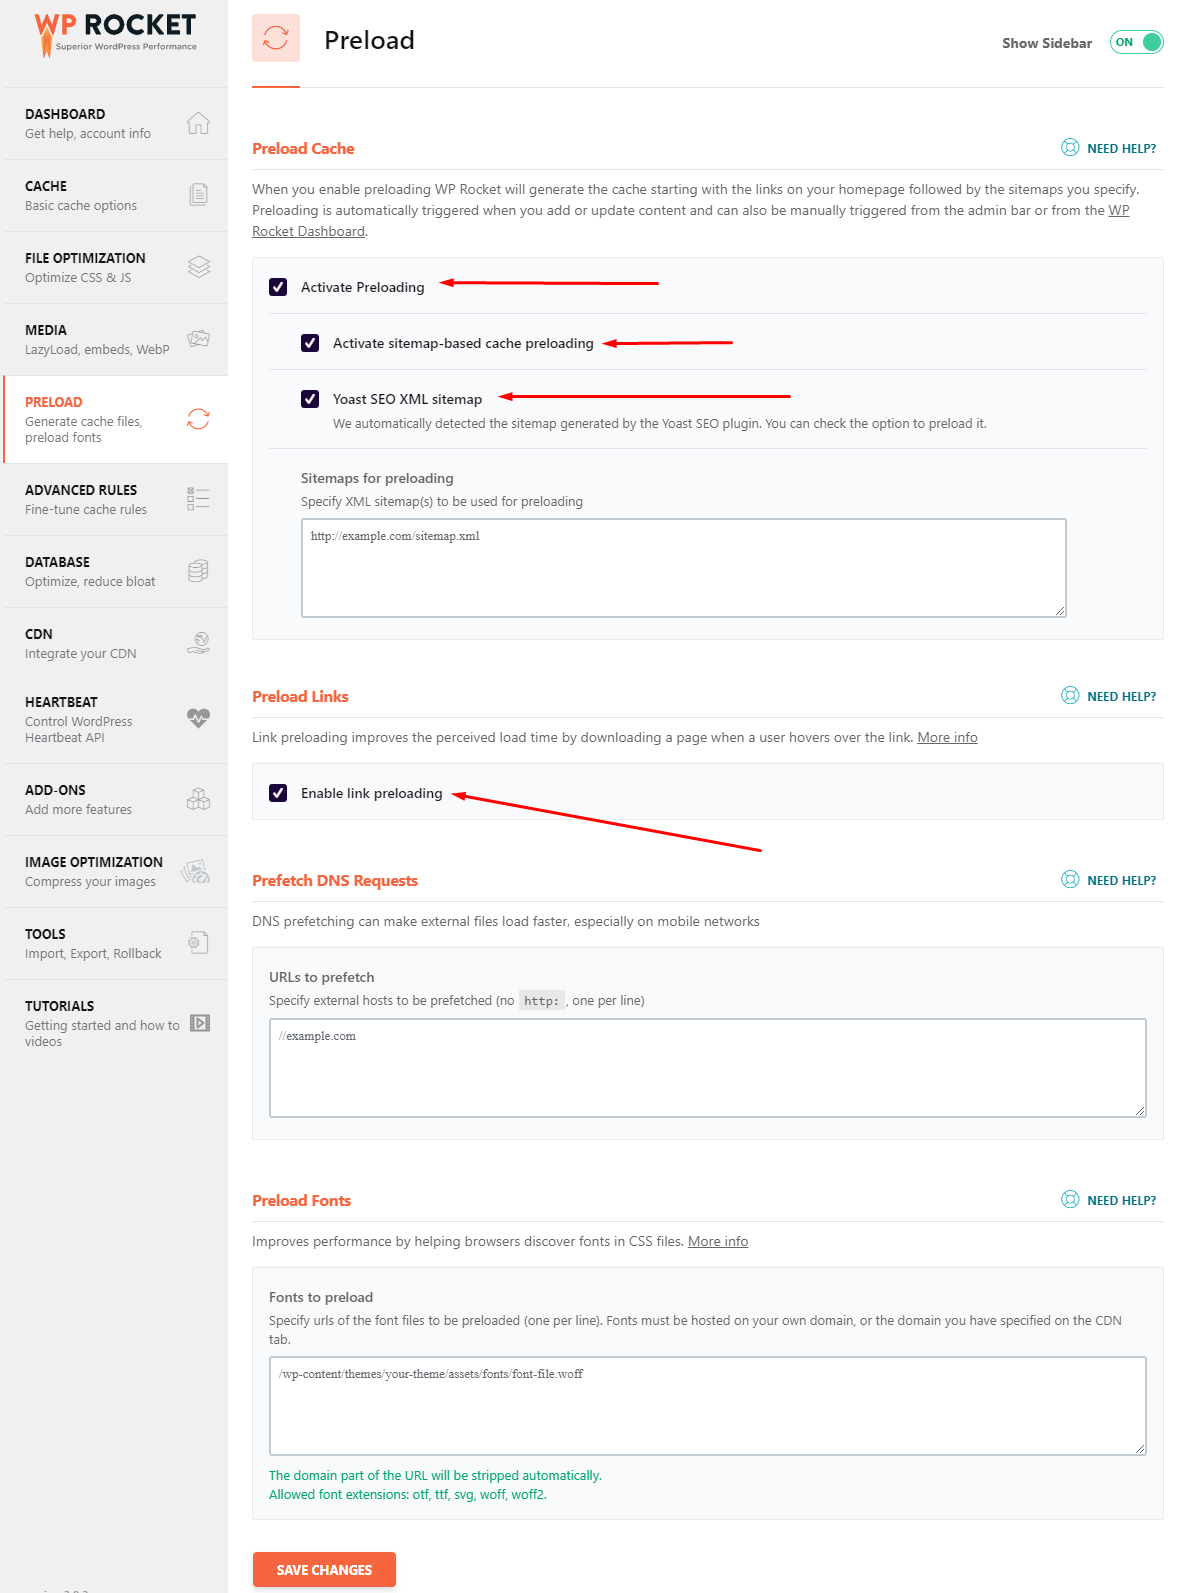
#4th Adjustment – Preload adjustment.
Now, we need to work with Preload adjustment. Let’s head over to the “Preload” tab, and let’s check the following options:
- Activate Preloading.
- > Activate sitemap-based cache preloading.
- > Yoast SEO XML sitemap.
- Enable link preloading.
And click on “Save Changes”.
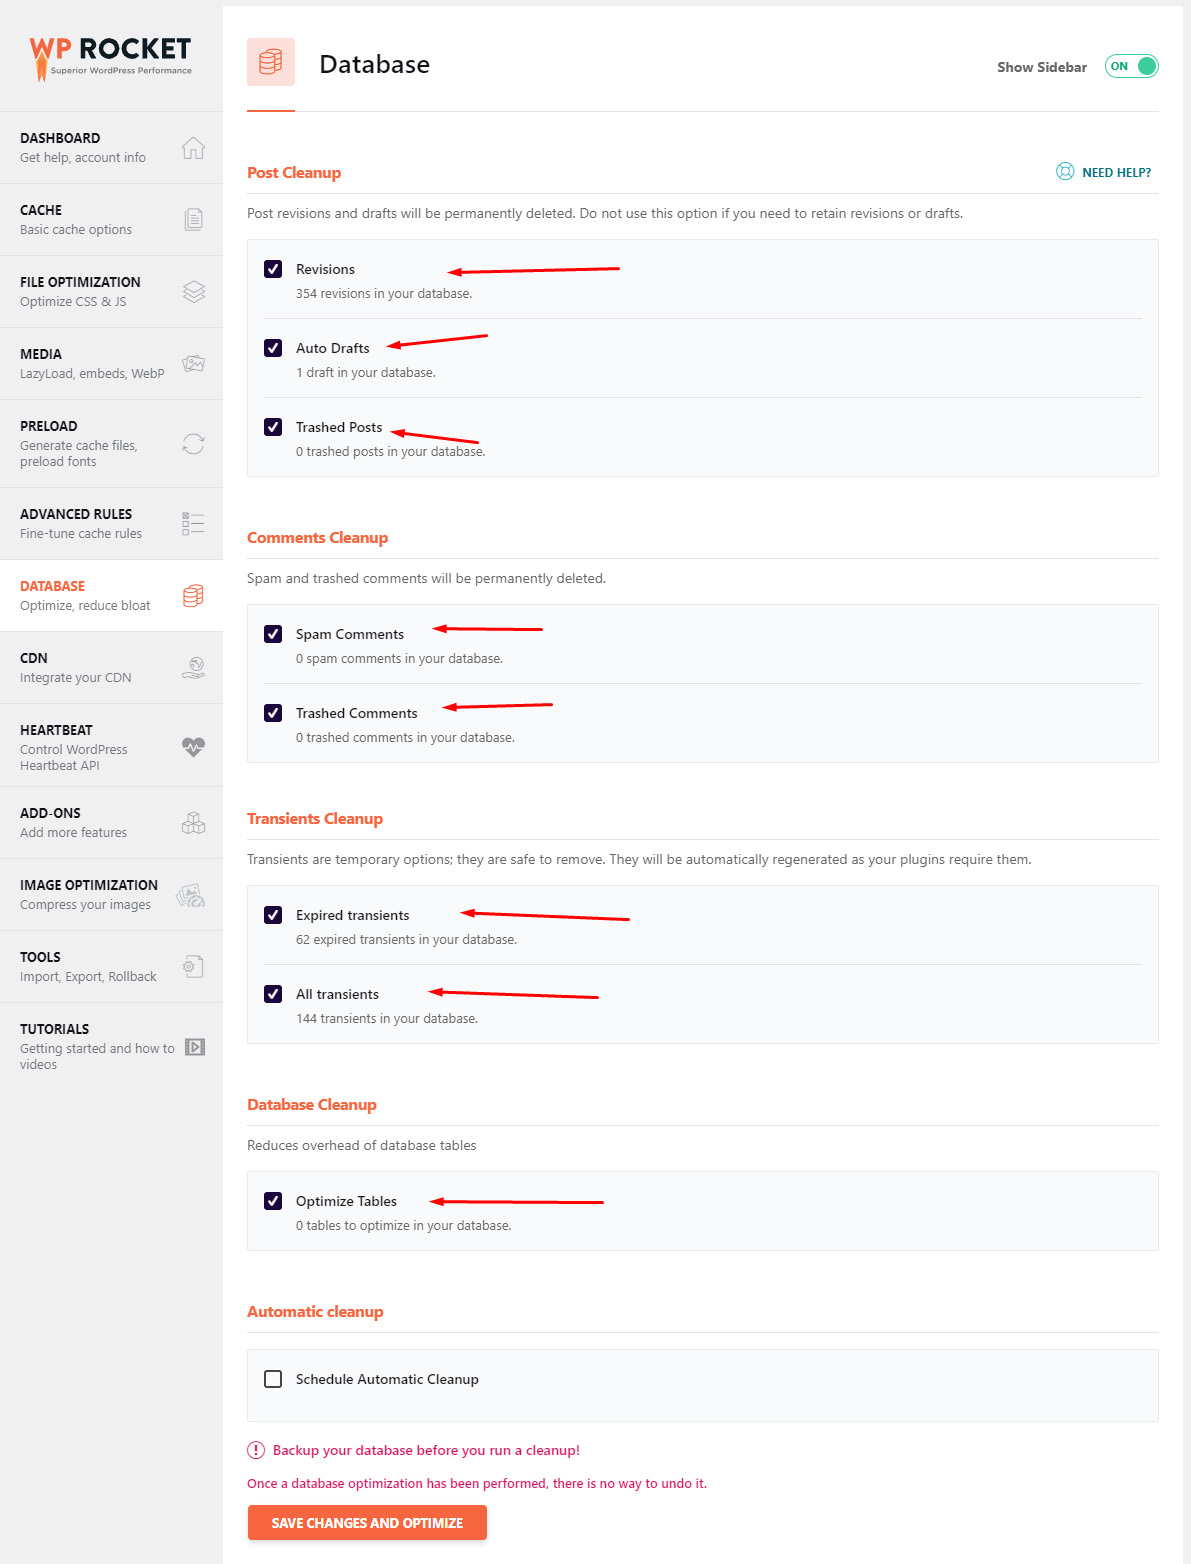
#5th Adjustment – Database adjustment.
These adjustments are really interesting ones.
They help us to remove elements that are not helpful and make your website load slower. Those elements are: Revisions, Auto Drafts, Trashed Post, Spam Comments, and more.
Before running this cleanup, it’s recommended to make a backup of your Database.
What I recommend choosing are:
- Revisions
- Auto Drafts
- Trashed Posts
- Spam Comments
- Trashed Comments
- Expired transients
- All transients
- Optimize Tables
And finally, click on “Save Changes and Optimize”.
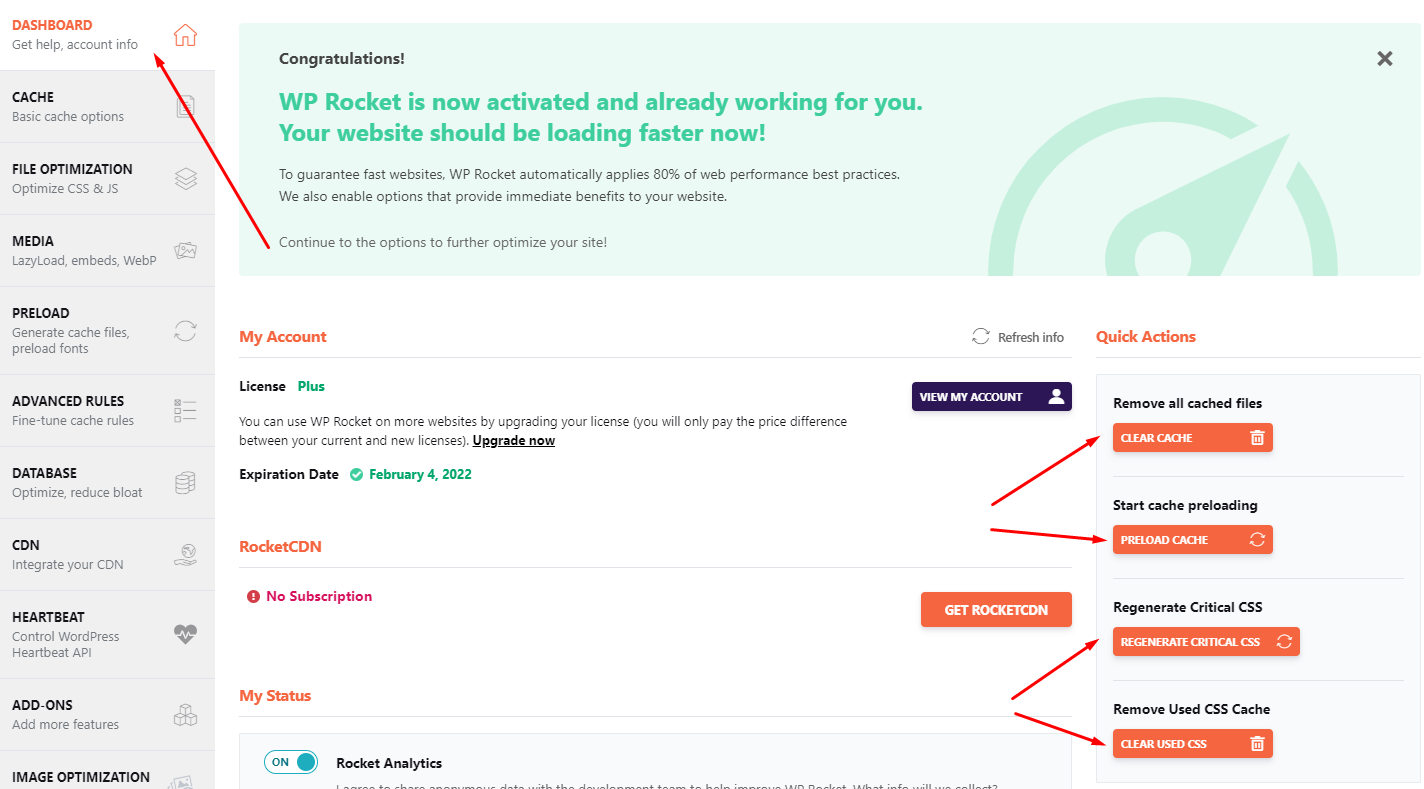
IMPORTANT: Remember to Clear Cache, Preload it, Regenerate Critical CSS and Clear Used CSS to avoid issues when updating pages or posting on your website.
Otherwise, you will not see the latest changes on your pages.
Those options are available within the Dashboard on the right side of the page. To proceed, click on the first option, wait for a little and then continue with the rest of the options.
It’s time to see how it goes.
Nervous? Don’t!
Let’s do another test, cross our fingers and wait for the best.
Step #4 – Making a New Speed Test.
Before the test, visit your website and see if it loads faster.
If it does, that’s a good signal.
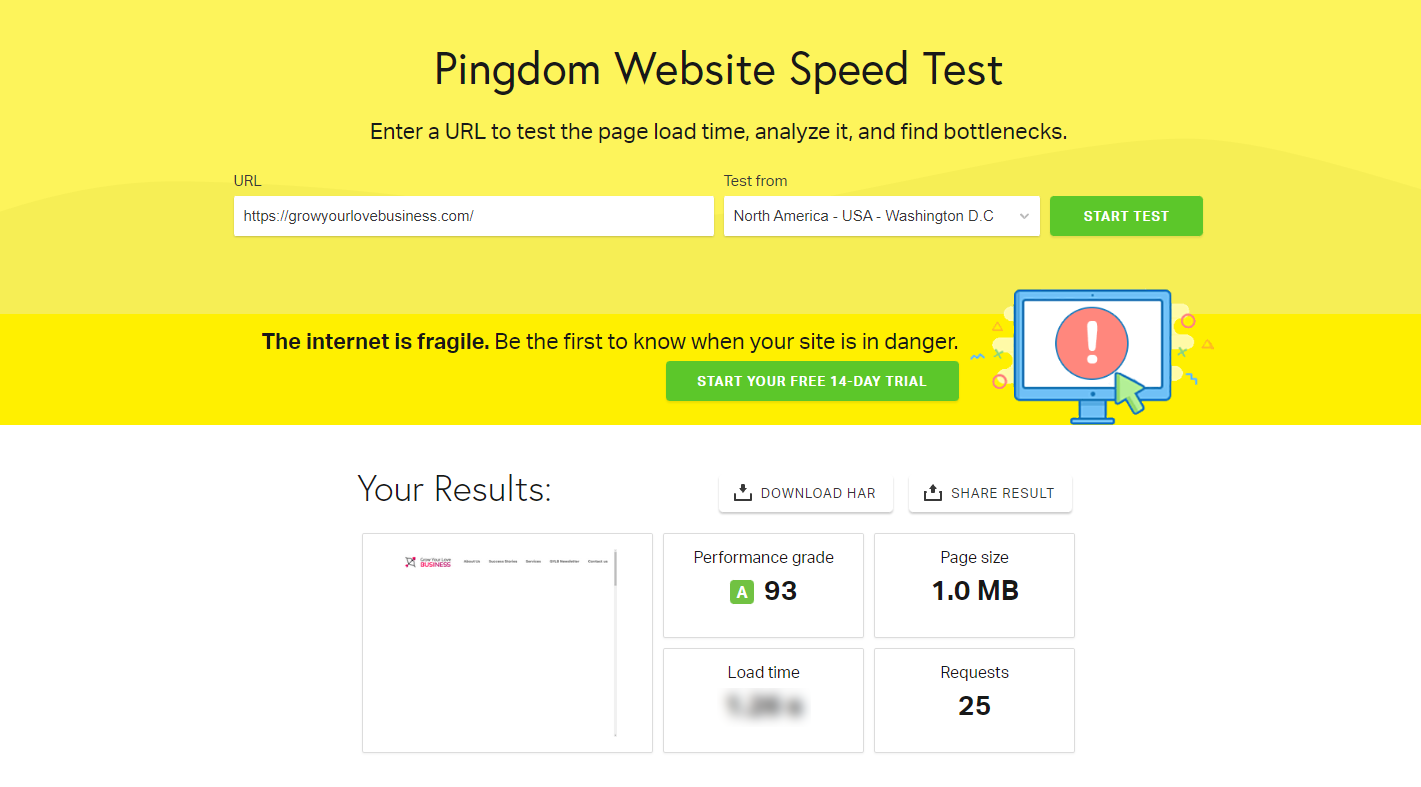
Let’s go back to Pingdom Website Speed Test Tool to perform a new test and see the result.

Nice!
Just 1.26 seconds with a performance grade of 93 out of 100.
From 14.33 seconds to 1 second, that’s a huge difference, to be more precise: 13.07 seconds of difference.
It’s Time to Take Action
I hope you enjoyed this case study, which can change your website speed the same day you follow the instructions.
As you can see, it’s not so complicated. Just a couple of adjustments, here and there, and boom, you have it.
Contact me if you would like to participate in upcoming case studies. Don’t forget to subscribe to my newsletter to be notified when there’s new content about digital marketing.
Lastly, I have a question: Do you plan to start using this formula to improve your website speed?
Let me know in the comments below.
Thanks for reading!
